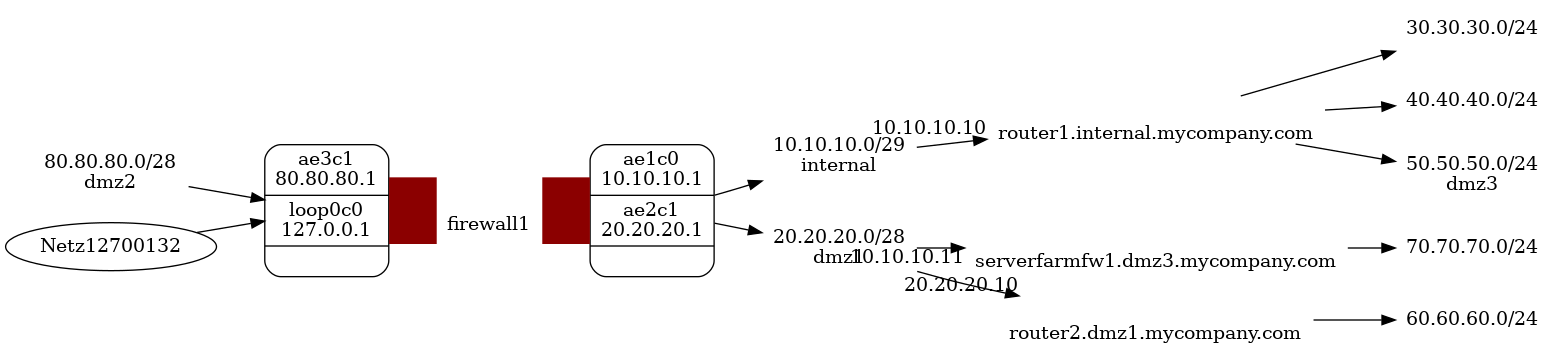
borrowed from https://itsecworks.com/2012/03/16/networking-topology-with-graphviz/ and http://ikiwiki.info/ikiwiki/directive/graph/
graph1:

graph2:

graph3:
As stated in the title, the blue android app does not collect any data, in any form or shape. Your Android device may do so, we don't!
This is opinionated for gitlab.xiph.org, the old VM is a buster, the new one a bookworm.
Our situation is that due to some failed spam bot cleanup some legitimate users where deleted, we want to restore their issue data, but we only have an old DB backup from just before the occurence. We will restore this and then upgrade our way up to the version on "prod", after which we will restore everything except the DB to get a more complete setup, we then need to find a way to restore the objects for the problematic users(which we have to identity - we know some).
- Get a VM
- Follow https://about.gitlab.com/install/#debian until just before installing gitlab itself
- Make sure to downgrade the apt sources list as needed if your OS is too new for the old gitlab version(for me bullseye worked)

- Do apt update
- Install the gitlab version from the backup i.e. if the Backupfile is named "/var/opt/gitlab/backups/1687588575_2023_06_24_16.0.5_gitlab_backup.tar" you want 16.0.5-ce.0
- Copy over the requesite file from /etc/gitlab/config_backup/gitlab_config_2023_06_24 and extract to /etc/gitlab/
tar -C / -xf gitlab_config_*2023_06_24*.tar
- Adapt config to new hostnames.
- Install acmetool and run:
acmetool want newhostname.newdomain.newtld
- Reconfigure gitlab
gitlab-ctl reconfigure
- Adapt acmetool config to work with the now running nginx(we needed the cert so nginx would start, so it could do the redirects AAAAAAARRRGGHHH before we could have acmetool place the files \o/):
# /var/lib/acme/conf/target
request:
  challenge:
    webroot-paths:
      - /var/www/.well-known/acme-challenge
    http-self-test: false
- Adapt cron for acmetool
# cat /etc/cron.d/acmetool
SHELL=/bin/sh
PATH=/bin:/sbin:/usr/bin:/usr/sbin:/usr/local/bin:/usr/local/sbin
MAILTO=root
6 23 * * * root SHELL=/bin/sh
PATH=/bin:/sbin:/usr/bin:/usr/sbin:/usr/local/bin:/usr/local/sbin
MAILTO=root
6 23 * * * root /usr/bin/acmetool --batch reconcile && gitlab-ctl restart
- Touch
/var/lib/acme/live/newhost.newdomain.newtld/revokedto force acmetool to renew - Run
/usr/bin/acmetool --batch reconcile && gitlab-ctl restart - Wait half an hour until your gitlab is back up, you now have a fresh instance
- Copy the backup and change perms
cp 1687588575_2023_06_24_16.0.5_gitlab_backup.tar /var/opt/gitlab/backups/
chown git:git /var/opt/gitlab/backups/1687588575_2023_06_24_16.0.5_gitlab_backup.tar
- Stop processes
sudo gitlab-ctl stop puma
sudo gitlab-ctl stop sidekiq
- Verify
sudo gitlab-ctl status
- Perform the magic
gitlab-backup restore BACKUP=1687588575_2023_06_24_16.0.5
- Start again and verify
gitlab-ctl status
gitlab-ctl start
- Wait....
- The frontpage of your instance should now look the same as on the original
- Remember we just restored the database from an auto db backup, we have NO data!
- This means we need to cheat a bit more and now upgrade the instance to the same version as in "prod" - currently 16.9.1-ce.0
- To do this we need to check Upgrade Paths \o/ - follow this https://docs.gitlab.com/ee/update/
- To get from 16.0.5 to 16.9.1 we will need to do: 16.0.8->16.1.6->16.2.9->16.3.7->16.7.6->16.9.1 \o/
- We will first tackle 16.0.8
apt install gitlab-ce=16.0.8-ce.0
- oh you are no admin? follow - https://forum.gitlab.com/t/how-do-i-change-my-profile-to-admin/35888
# gitlab-rails console -e production
--------------------------------------------------------------------------------
 Ruby:         ruby 3.0.6p216 (2023-03-30 revision 23a532679b) [x86_64-linux]
 GitLab:       16.0.8 (267ff69e3cc) FOSS
 GitLab Shell: 14.20.0
 PostgreSQL:   13.11
------------------------------------------------------------[ booted in 41.50s ]
Loading production environment (Rails 6.1.7.2)
irb(main):001:0>
irb(main):002:0> user = User.find_by(username: 'stephan48')
=> #<User id:633 @stephan48>
irb(main):003:0> user.admin = true
=> true
irb(main):004:0> user.save!
=> true
irb(main):005:0>
- Check for background migrations - https://gitlab-restore.xiph.org/admin/background_migrations
- Before the next step change the /etc/apt/sources.list.d/gitlab_gitlab-ce.list back to bookworm
- Perform the next upgrade
apt update
apt install gitlab-ce=16.1.6-ce.0
- Wait
- In the meantime do a backup on "prod"
gitlab-backup create
- Gitlab wants a redis restart after the upgrade
gitlab-ctl restart redis
Wait for the instance coming up and check background migrations - it actually had to do stuff here
Do the next step (hint you can add "-d" to already download the package while waiting...)
apt install gitlab-ce=16.2.9-ce.0
- Restart redis again
gitlab-ctl restart redis
Wait for the instance coming up and check background migrations - it actually had to do stuff here
Do the next step (hint you can add "-d" to already download the package while waiting...)
apt install -d gitlab-ce=16.3.7-ce.0
apt install gitlab-ce=16.3.7-ce.0
Wait for the instance coming up and check background migrations - it actually had to do stuff here
Do the next step (hint you can add "-d" to already download the package while waiting...)
apt install -d gitlab-ce=16.7.6-ce.0
apt install -d gitlab-ce=16.9.1-ce.0
apt install gitlab-ce=16.7.6-ce.0
- Redis upgrade time \o/
gitlab-ctl restart redis
Wait for the instance coming up and check background migrations - it actually had to do stuff here again - this repetition is getting boring?

Do the next step (hint you can add "-d" to already download the package while waiting...)
apt install gitlab-ce=16.9.1-ce.0
- Wait until its done
- You are now on the same version as the "prod" instance
- Copy over the Backup
- Place it inside /var/opt/gitlab/backups and chown it
mv 1709683168_2024_03_05_16.9.1_gitlab_backup.tar /var/opt/gitlab/backups/
chown git: /var/opt/gitlab/backups/1709683168_2024_03_05_16.9.1_gitlab_backup.tar
- Before doing anything more, do a backup of the restored VM before the restore
gitlab-backup create
We now have the backup 1709722674_2024_03_06_16.9.1_gitlab_backup.tar in /var/opt/gitlab/backups/
We now restore the copied backup EXCEPT the db, this gives us some more logical context for our data
gitlab-backup restore BACKUP=1709683168_2024_03_05_16.9.1 SKIP=db
- After this is done you should have all repodata back \o/
- Do another backup just to be safe
gitlab-backup create
We now get 1709724053_2024_03_06_16.9.1_gitlab_backup.tar
We are done \o/
We now got a point in time restore for the given old backup which was created by a gitlab before a upgrade. We only had a database backup, because thats all gitlab does.
The next steps are to find out how to reimport the previously lost issues back into the main instance. Maybe that will be another blog post.
...
https://docs.k3s.io/advanced#known-issues-with-rootless-mode https://github.com/k3s-io/k3s/issues/6488#issuecomment-1339946080 https://bank-vaults.dev/docs/installing/
adduser k3s-vault

# user gets ID 1003

cat /etc/systemd/system/user@1003.service.d/override.conf; echo
[Service]
Delegate=cpu cpuset io memory pids


sudo tee -a /etc/modules-load.d/k3s-rootless <<EOF
fuse
tun
tap
bridge
br_netfilter
veth
ip_tables
ip6_tables
iptable_nat
ip6table_nat
iptable_filter
ip6table_filter
nf_tables
x_tables
xt_MASQUERADE
xt_addrtype
xt_comment
xt_conntrack
xt_mark
xt_multiport
xt_nat
xt_tcpudp
EOF

apt install uidmap fuse-overlayfs

printf "net.ipv4.ip_forward=1\n net.ipv6.conf.all.forwarding=1\n" | sudo tee -a /etc/sysctl.d/forwarding.conf
sysctl --system

loginctl enable-linger username # enable k3s to be always on
as user(machinectl shell username@ to ensure systemd session):
wget https://raw.githubusercontent.com/k3s-io/k3s/master/k3s-rootless.service
$ mkdir -p .config/systemd/user
# adapt file and add following env vars
Environment=K3S_ROOTLESS_CIDR="10.41.0.0/16"
Environment=K3S_ROOTLESS_PORT_DRIVER=slirp4netns
Environment=K3S_ROOTLESS_DISABLE_HOST_LOOPBACK=true
Environment=K3S_ROOTLESS_MTU=1500

mkdir bin
   10  wget https://github.com/k3s-io/k3s/releases/download/v1.28.2%2Bk3s1/k3s
   12  mv k3s bin/
   17  chmod +x bin/k3s
   18  ln -rs bin/k3s bin/kubectl

add to .bashrc:
export PATH=~/bin:$PATH
export KUBECONFIG=~/.kube/k3s.yaml

   21  systemctl --user enable --now k3s-rootless.service
   22  systemctl --user status k3s-rootless

# kubectl version should now work.

   54  wget https://get.helm.sh/helm-v3.13.1-linux-amd64.tar.gz
   55  tar xfvz helm-v3.13.1-linux-amd64.tar.gz
   56  mv linux-amd64/helm bin/
   57  chmod +x bin/helm


helm upgrade --install --wait vault-operator oci://ghcr.io/bank-vaults/helm-charts/vault-operator
kubectl kustomize https://github.com/bank-vaults/vault-operator/deploy/rbac | kubectl apply -f -
kubectl apply -f https://raw.githubusercontent.com/bank-vaults/vault-operator/v1.21.0/deploy/examples/cr-raft.yaml


kubectl edit vault
add disable_mlock: true to config # or figure out how to allow mlock in rootless k3s

  104  wget https://github.com/bank-vaults/bank-vaults/releases/download/1.20.4/bank-vaults-linux-amd64.tar.gz
  105  tar xfvz bank-vaults-linux-amd64.tar.gz
  106  mv bank-vaults bin/
  107  chmod +x bin/bank-vaults

  109  wget https://releases.hashicorp.com/vault/1.15.1/vault_1.15.1_linux_amd64.zip
  110  unzip vault_1.15.1_linux_amd64.zip
  111  mv vault bin/
  112  chmod +x bin/vault


kubectl create namespace vault-infra
kubectl label namespace vault-infra name=vault-infra

helm upgrade --install --wait vault-secrets-webhook oci://ghcr.io/bank-vaults/helm-charts/vault-secrets-webhook --namespace vault-infra


kubectl apply -f - <<EOF
apiVersion: apps/v1
kind: Deployment
metadata:
  name: vault-test
spec:
  replicas: 1
  selector:
    matchLabels:
      app.kubernetes.io/name: vault
  template:
    metadata:
      labels:
        app.kubernetes.io/name: vault
      annotations:
        vault.security.banzaicloud.io/vault-addr: "https://vault:8200" # optional, the address of the Vault service, default values is https://vault:8200
        vault.security.banzaicloud.io/vault-role: "default" # optional, the default value is the name of the ServiceAccount the Pod runs in, in case of Secrets and ConfigMaps it is "default"
        vault.security.banzaicloud.io/vault-skip-verify: "false" # optional, skip TLS verification of the Vault server certificate
        vault.security.banzaicloud.io/vault-tls-secret: "vault-tls" # optional, the name of the Secret where the Vault CA cert is, if not defined it is not mounted
        vault.security.banzaicloud.io/vault-agent: "false" # optional, if true, a Vault Agent will be started to do Vault authentication, by default not needed and vault-env will do Kubernetes Service Account based Vault authentication
        vault.security.banzaicloud.io/vault-path: "kubernetes" # optional, the Kubernetes Auth mount path in Vault the default value is "kubernetes"
    spec:
      serviceAccountName: default
      containers:
      - name: alpine
        image: alpine
        command: ["sh", "-c", "echo \$AWS_SECRET_ACCESS_KEY && echo going to sleep... && sleep 10000"]
        env:
        - name: AWS_SECRET_ACCESS_KEY
          value: vault:secret/data/demosecret/aws#AWS_SECRET_ACCESS_KEY
EOF
This post should details the crazy journey on how i managed(or failed) to waste lots of my time and in the end got a rootless k3s cluster with bgp for loadbalancer IPs via metallb.
Your sanity might not survive this read. Mine did not survive the project :P
... insert (k3s) rootless working principle here ...
How does k3s setup the network:
- k3s server is started - calls into rootlesskit https://github.com/k3s-io/k3s/blob/38a0b91c1a917d2866aee265bc7815424af3e701/pkg/rootless/rootless.go#L37
- k3s server then forks itself(where?) to handle parent(outside netns) and child(inside netns) operations.
- does not allow us to change from slirp4netns to something else like lxc-nic(easier to patch).
- Rootlesskit creates external(slirp4netns) process to attach tap interface - https://github.com/rootless-containers/rootlesskit/blob/master/pkg/network/slirp4netns/slirp4netns.go#L176
- slirp4netns is called with specific options, theres no intelligent return mechanism for interface config, hence we have to reuse whats there
- Rootlesskit does child network configuration - https://github.com/rootless-containers/rootlesskit/blob/master/pkg/child/child.go#L156
- where does the tap0 device comes from? https://github.com/rootless-containers/rootlesskit/blob/master/pkg/network/slirp4netns/slirp4netns.go#L182
- we will need to remove this and redo some of the network configuration
- k3s packages its own slirp4netns, need to override that to do our magic
- ln -fs bin/slirp4netns .rancher/k3s/data/current/bin/slirp4netns
- because k3s sets up the bin to be used here
 https://github.com/k3s-io/k3s/blob/0d23cfe038ef22d7ca899764e9aaeea8a39d4874/cmd/k3s/main.go#L189
Wrote slirp4netns wrapper(crude & insecure, will need to harden):
- rootless wrapper:
- will write environment infos as json for rootfull process to intercept and handle
- will wait until marker file is there to wait for further startup
- rootfull wrapper:
- takes network information from json file
- creates additional netns for support processes(i.e. attaching to lan network via dhcp)
- dns, bgp(to lan, to cluster)
- setups correct IP addresses on both sides
- network links:
- helper ns <-> host - attach do well defined bridge on host for dhcp
- helper ns <-> cluster - uplink handling
Learnings:
- lsns -t net is freaking awesome
- you can address network namespaces by name(optional), pids of processed in them, network namespace id
- unless you are root on the host you can't switch between network namespaces
TODO:
- how to handle ipv6?
- how to conjure all of this securely?
- what provides dns?
- in slirp4netns?
- can i reuse avard-dns? netavard? postman?
- resort do dnsmasq?
Interesting Reads: * https://linux-blog.anracom.com/2017/10/30/fun-with-veth-devices-in-unnamed-linux-network-namespaces-i/
It works!!!
TODO: Document Magic Script, Automate IT, PROFIT
IPv6:
Yes because i am a masochist.
Hi,
when you use fluxcd2 to allow teams/apps to be seperated into namesapces and wanna use Principle of least Privilege/limit to the target namespace, be careful with the following:
- Errors around secrets are masked as "error: data values must be of type string" as per (this discussion)[https://github.com/fluxcd/flux2/discussions/2355]
- disable/remove them for testing, otherwhise you can't debug, this is a gross UX issue.
- You apply the kustomization(kustomize.toolkit.fluxcd.io/v1beta1) referencing the remote repo/stuff the following mess of namespaces apply:
- the resource itself
- goes into namespace A
- targetNamespace
- should place stuff into namespace B
- telling it to use a "serviceAccountName"
- needs to exist in namespace A but needs to have permission in namespace B
- use decryption
- secretRef for that needs to be in namespace A
- the resource itself
More to be followed 
....
This is just a wip command by command play by play for now, i will add context and infos later(TM).
random comments:
- root$ denotes stuff done as root
- $ denotes stuff done as normal user
- you totally can use a different easy-rsa instance to generate your sub-ca, it does not need to be done in the root-ca "pki" - i will try to mark the points where you need to divert at a later time, essentially you need two easy-rsa instances(go figure, one with a ca build and one without - and then move the CSR/Finished cert between them)
root$ apt install easy-rsa

$ make-cadir talos1-step-ca-autocert
$ cd talos1-step-ca-autocert
$ find
.
./vars
./x509-types
./easyrsa
./openssl-easyrsa.cnf
$ ./easyrsa init-pki
* Notice:

  init-pki complete; you may now create a CA or requests.

  Your newly created PKI dir is:
  * /home/kind01/talos1-step-ca-autocert/pki

* Notice:
  IMPORTANT: Easy-RSA 'vars' file has now been moved to your PKI above.

$ vim pki/vars
set_var EASYRSA_DN      "org"
set_var EASYRSA_REQ_COUNTRY     "DE"
set_var EASYRSA_REQ_PROVINCE    "Internet"
set_var EASYRSA_REQ_CITY        "Internet"
set_var EASYRSA_REQ_ORG "XX"
set_var EASYRSA_REQ_EMAIL       "XX"
set_var EASYRSA_REQ_OU          "K8s OU"
set_var EASYRSA_ALGO            ed
set_var EASYRSA_CURVE           ed25519

$ mkdir pki/x509-types
$ find x509-types

$ ./easyrsa build-ca
* Notice:
Using Easy-RSA configuration from: /home/kind01/talos1-step-ca-autocert/pki/vars

* Notice:
Using SSL: openssl OpenSSL 3.0.8 7 Feb 2023 (Library: OpenSSL 3.0.8 7 Feb 2023)


Enter New CA Key Passphrase:
Re-Enter New CA Key Passphrase:
Using configuration from /home/kind01/talos1-step-ca-autocert/pki/ef8549d7/temp.229d8fce
Enter PEM pass phrase:
Verifying - Enter PEM pass phrase:
-----
You are about to be asked to enter information that will be incorporated
into your certificate request.
What you are about to enter is what is called a Distinguished Name or a DN.
There are quite a few fields but you can leave some blank
For some fields there will be a default value,
If you enter '.', the field will be left blank.
-----
Country Name (2 letter code) [DE]:
State or Province Name (full name) [Internet]:
Locality Name (eg, city) [Internet]:
Organization Name (eg, company) [Internet]: XX
Organizational Unit Name (eg, section) [K8s OU]:
Common Name (eg: your user, host, or server name) [Easy-RSA CA]:root-ca.example.org
Email Address [XX]:

# it wants to have all relevant types in the pki x509-types dir, so we oblige
$ for i in x509-types/*; do ln -sr $i pki/x509-types/; done

$ vim pki/x509-types/k8s_ca
# CA_PATH_LEN for CA path length limits. You could also do this here
# manually as in the following example in place of the existing line:
#
# basicConstraints = CA:TRUE, pathlen:0

subjectKeyIdentifier = hash
authorityKeyIdentifier = keyid:always,issuer:always
keyUsage = cRLSign, keyCertSign

# this magic bit creates a subca which is not allowed to sign other CAs - nice fun :)
basicConstraints = critical, CA:TRUE, pathlen:0
keyUsage = critical, keyCertSign, cRLSign
subjectKeyIdentifier = hash
nameConstraints = critical,@nameconsts
subjectAltName = critical,@sans

[sans]
# configure all the namespaces & aliases here - atleast what you used for the commonname of the subca(to be created) and the CA alias in the cluster
DNS.0=cluster-ca.example.org
# helm-release-name.namespace.svc.cluster-local
DNS.1=step-certificates-autocert.step-ca-autocert.svc.cluster.local

[nameconsts]
# apparently ordered numbers are not needed :P
permitted;DNS.0=.kubecluster.example.org
permitted;DNS.2=kubecluster.example.org
# repeat the DNS.1 SAN here in the nameconstraint
permitted;DNS.3=step-certificates-autocert.step-ca-autocert.svc.cluster.local
# allow it to build certs for all nodenames in the cluster
permitted;DNS.4=kubemaster.example.org
permitted;DNS.5=kubenode01.example.org
permitted;DNS.6=kubenode02.example.org
:wq

# we need to make sure to include the CN(or a DNS constraint allowing certs for the CN) in the nameconstraints
# as this is a specialized usecase we will use the following instead
# this ca is just a testcase for providing local certs which we will then turn into ssh host certs along the way.
# my normal ca is too restricted and not really the perfect usecase for this, so we will use a specialised setup
# like here(i promise i will write a blogpost about the big picture soon(TM)):

$ vim pki/x509-types/k8s_ca
# X509 extensions for a ca

# Note that basicConstraints will be overridden by Easy-RSA when defining a
# CA_PATH_LEN for CA path length limits. You could also do this here
# manually as in the following example in place of the existing line:
#
# basicConstraints = CA:TRUE, pathlen:1

subjectKeyIdentifier = hash
authorityKeyIdentifier = keyid:always,issuer:always
keyUsage = cRLSign, keyCertSign

basicConstraints = critical, CA:TRUE, pathlen:0
keyUsage = critical, keyCertSign, cRLSign
subjectKeyIdentifier = hash
nameConstraints = critical,@nameconsts
subjectAltName = critical,@sans

[sans]
DNS.0=autocert-ca.kubecluster.example.org
DNS.1=step-certificates-autocert.step-ca-autocert.svc.cluster.local

[nameconsts]
permitted;DNS.0=.svc.cluster.local
permitted;DNS.1=svc.cluster.local
permitted;DNS.2=svc
permitted;DNS.3=.svc
permitted;DNS.4=step-certificates-autocert.step-ca-autocert.svc.cluster.local
:wq

$ ./easyrsa gen-req autocert-ca.kubecluster.example.org
* Notice:
Using Easy-RSA configuration from: /home/kind01/talos1-step-ca-autocert/pki/vars

* Notice:
Using SSL: openssl OpenSSL 3.0.8 7 Feb 2023 (Library: OpenSSL 3.0.8 7 Feb 2023)

Enter PEM pass phrase:
Verifying - Enter PEM pass phrase:
-----
You are about to be asked to enter information that will be incorporated
into your certificate request.
What you are about to enter is what is called a Distinguished Name or a DN.
There are quite a few fields but you can leave some blank
For some fields there will be a default value,
If you enter '.', the field will be left blank.
-----
Country Name (2 letter code) [DE]:
State or Province Name (full name) [Internet]:Internet
Locality Name (eg, city) [Internet]:NA
Organization Name (eg, company) [Internet]: Internet
Organizational Unit Name (eg, section) [K8s OU]:autocert-ca.kubecluster.example.org
Common Name (eg: your user, host, or server name) [autocert-ca.kubecluster.example.org]:autocert-ca.kubecluster.example.org
Email Address [email@mail.de]:
* Notice:

Keypair and certificate request completed. Your files are:
req: /home/kind01/talos1-step-ca-autocert/pki/reqs/autocert-ca.kubecluster.example.org.req
key: /home/kind01/talos1-step-ca-autocert/pki/private/autocert-ca.kubecluster.example.org.key

$ ./easyrsa sign-req k8s_ca autocert-ca.kubecluster.example.org
* Notice:
Using Easy-RSA configuration from: /home/kind01/talos1-step-ca-autocert/pki/vars

* Notice:
Using SSL: openssl OpenSSL 3.0.8 7 Feb 2023 (Library: OpenSSL 3.0.8 7 Feb 2023)


You are about to sign the following certificate.
Please check over the details shown below for accuracy. Note that this request
has not been cryptographically verified. Please be sure it came from a trusted
source or that you have verified the request checksum with the sender.

Request subject, to be signed as a k8s_ca certificate for 825 days:

subject=
    countryName               = DE
    stateOrProvinceName       = Internet
    localityName              = NA
    organizationName          = Internet
    organizationalUnitName    = autocert-ca.kubecluster.example.org
    commonName                = autocert-ca.kubecluster.example.org
    emailAddress              = email@mail.de


Type the word 'yes' to continue, or any other input to abort.
  Confirm request details: yes

Using configuration from /home/kind01/talos1-step-ca-autocert/pki/f9c9b30f/temp.d2f985fe
Enter pass phrase for /home/kind01/talos1-step-ca-autocert/pki/private/ca.key:
Check that the request matches the signature
Signature ok
The Subject's Distinguished Name is as follows
countryName           :PRINTABLE:'DE'
stateOrProvinceName   :ASN.1 12:'Internet'
localityName          :ASN.1 12:'NA'
organizationName      :ASN.1 12:'Internet'
organizationalUnitName:ASN.1 12:'autocert-ca.kubecluster.example.org'
commonName            :ASN.1 12:'autocert-ca.kubecluster.example.org'
emailAddress          :IA5STRING:'email@mail.de'
Certificate is to be certified until Jul  3 20:35:45 2025 GMT (825 days)

Write out database with 1 new entries
Data Base Updated

* Notice:
Certificate created at: /home/kind01/talos1-step-ca-autocert/pki/issued/autocert-ca.kubecluster.example.org

$ openssl x509 -in /home/kind01/talos1-step-ca-autocert/pki/issued/autocert-ca.kubecluster.example.org.crt -noout -text
Certificate:
    Data:
        Version: 3 (0x2)
        Serial Number:
            e4:d8:77:27:38:04:01:b4:38:92:7d:ea:1d:5a:fd:fb
        Signature Algorithm: ED25519
        Issuer: C = DE, ST = Internet, L = Internet, O = Internet, OU = K8s OU, CN = ca.talos1-autocert-root.internal.kubecluster.example.org, emailAddress = "email@mail.de"
        Validity
            Not Before: Mar 31 20:35:45 2023 GMT
            Not After : Jul  3 20:35:45 2025 GMT
        Subject: C = DE, ST = Internet, L = NA, O = Internet, OU = autocert-ca.kubecluster.example.org, CN = autocert-ca.kubecluster.example.org, emailAddress = "email@mail.de"
        Subject Public Key Info:
            Public Key Algorithm: ED25519
                ED25519 Public-Key:
                pub:
                    b9:27:d2:8f:3e:77:97:d0:2e:fa:d3:88:59:41:a9:
                    2a:90:1d:eb:f6:e5:77:e1:72:9a:ac:f8:c3:37:65:
                    2f:27
        X509v3 extensions:
            X509v3 Authority Key Identifier:
                keyid:F9:ED:D1:0C:5C:18:A8:AD:C7:79:05:00:B0:CA:CF:48:6B:96:56:B8
                DirName:/C=DE/ST=Internet/L=Internet/O=Internet/OU=K8s OU/CN=ca.talos1-autocert-root.internal.kubecluster.example.org/emailAddress=email@mail.de
                serial:27:6D:88:DB:92:45:CF:B0:05:93:20:C2:22:6C:86:2A:2B:1E:39:73
            X509v3 Basic Constraints: critical
                CA:TRUE, pathlen:0
            X509v3 Key Usage: critical
                Certificate Sign, CRL Sign
            X509v3 Subject Key Identifier:
                72:38:52:95:8C:5A:2E:F9:71:BE:3F:EB:F5:D5:AF:98:28:1B:C0:97
            X509v3 Name Constraints: critical
                Permitted:
                  DNS:.svc.cluster.local
                  DNS:svc.cluster.local
                  DNS:svc
                  DNS:.svc
                  DNS:step-certificates-autocert.step-ca-autocert.svc.cluster.local
            X509v3 Subject Alternative Name: critical
                DNS:autocert-ca.kubecluster.example.org, DNS:step-certificates-autocert.step-ca-autocert.svc.cluster.local
    Signature Algorithm: ED25519
    Signature Value:
        a4:2f:d9:5f:ea:99:1d:3a:6c:e2:39:e1:79:7e:9c:02:2a:e5:
        7b:78:a3:52:3b:89:b4:a7:44:c0:29:f4:e3:7e:d0:b7:a5:91:
        5b:f5:4f:43:f9:c8:8e:db:c4:58:a3:b6:61:42:44:47:58:d0:
        02:5f:44:2f:9a:00:c7:38:57:05
its not the end yet
I have a couple of systems which have a variation of the following "stack":
- Physical Disks(does not matter the type)
- Partitions
- mdadm raid*
- dm-crypt luks
- lvm or partition
I want to resize them online, without shutting down the system or components at all. This is the documentation how i normally do this.
We need some infos:
- Identify the relevant vg to extend
- Identify which cryptsetup volume/source underpins the pv
- Identify which raid underpins the dm-crypt volume
- Identity physical disks
Alls of this can be found via a simple call to lsblk:
$ lsblk
...
nvme0n1                                                    259:0    0   1.7T  0 disk
├─nvme0n1p1                                                259:1    0   953M  0 part
└─nvme0n1p2                                                259:2    0 837.3G  0 part
  └─md127                                                    9:127  0 837.1G  0 raid1
    └─frey-fast-crypt                                      253:88   0   744G  0 crypt
      ├─frey--fast--vg-v1_temp                             253:1    0    35G  0 lvm
...
nvme1n1                                                    259:4    0   1.7T  0 disk
├─nvme1n1p1                                                259:5    0   953M  0 part
└─nvme1n1p2                                                259:6    0 837.3G  0 part
  └─md127                                                    9:127  0 837.1G  0 raid1
    └─frey-fast-crypt                                      253:88   0   744G  0 crypt
      ├─frey--fast--vg-v1_temp                             253:1    0    35G  0 lvm
...
This will nicely show all the relevant informations, like the VG, the raid, the physical disks, the partitions.
To resize this we need to do the following steps in order:
- Check initial status:
# pvs
  PV                                                    VG           Fmt  Attr PSize   PFree
  /dev/mapper/frey-fast-crypt                           frey-fast-vg lvm2 a--  743.98g 65.98g
- Check if we have capacity to resize the underlying partitions(the infos marked with *** are the relevant ones) (do this on all raid disks)
$ parted /dev/nvme1n1
GNU Parted 3.4
Using /dev/nvme1n1
Welcome to GNU Parted! Type 'help' to view a list of commands.
(parted) print
Model: SAMSUNG MZQLB1T9HAJR-00007 (nvme)
Disk /dev/nvme1n1: ***1920GB***
Sector size (logical/physical): 512B/512B
Partition Table: msdos
Disk Flags:

Number  Start   End     Size   Type     File system  Flags
 1      1049kB  1000MB  999MB  primary
 2      1000MB  ***900GB***   899GB  primary

(parted)
- Resize the Partitions (do this on all raid disks)
$ parted /dev/nvme1n1
GNU Parted 3.4
(parted) resizepart 2 1000G
- Resize the RAID
$ mdadm --grow --size=max /dev/md127
- Resize cryptsetup volume
$ cryptsetup resize frey-fast-crypt
Enter passphrase for /dev/md127:
- Resize the PV volume
pvresize /dev/mapper/frey-fast-crypt
  Physical volume "/dev/mapper/frey-fast-crypt" changed
  1 physical volume(s) resized or updated / 0 physical volume(s) not resized
- Check that it worked
$ pvs
  PV                                                    VG           Fmt  Attr PSize   PFree
  /dev/mapper/frey-fast-crypt                           frey-fast-vg lvm2 a--  837.11g 159.11g
...
If you don't have a LVM on/inside the LUKS/cryptsetup you can just use your filesystems resize mechanism:
resize2fs /dev/mapper/frey-fast-crypt
This article is incomplete as of yet. It describes how to setup a network namespace based seperation of concerns for arbitrary downloaders on a Debian system without leaking traffic from downloading via the main network/internet facing interfaces.
Install Packages
$ apt install jq bc openvpn
#Download netns-ctl from $SOURCE (not published yet)
cd netns-ctl
$ sudo make install
$ sudo -i
mkdir -p /etc/netns/{protonvpn-ch,vm-down}/{network/{if-down.d,if-post-down.d,if-pre-up.d,if-up.d,netns-scripts,interfaces.d},iptables}
vim /etc/network/interfaces.d/pvpn-ch
allow-hotplug pvpn-ch
auto pvpn-ch
iface pvpn-ch inet static
 address 10.33.0.1
 netmask 255.255.255.252
vim /etc/network/interfaces.d/vm-down
allow-hotplug vm-down
auto vm-down
iface vm-down inet static
 address 10.33.0.9
 netmask 255.255.255.252
vim /etc/netns/protonvpn-ch/network/interfaces
auto main
iface main inet static
 address 10.33.0.2
 netmask 255.255.255.252
 up ip route add 185.159.157.0/24 via 10.33.0.1 dev main
 up ip route add 193.36.117.0/24 via 10.33.0.1 dev main

allow-hotplug vm-down
auto vm-down
iface vm-down inet static
 address 10.33.0.5
 netmask 255.255.255.252

auto lo
iface lo inet loopback
vim /etc/netns/vm-down/network/interfaces
allow-hotplug main
auto main
iface main inet static
 address 10.33.0.10
 netmask 255.255.255.252

allow-hotplug pvpn-ch
auto pvpn-ch
iface pvpn-ch inet static
 address 10.33.0.6
 netmask 255.255.255.252
 up ip route add default via 10.33.0.5 dev pvpn-ch
touch /etc/netns/protonvpn-ch/resolv.conf.vpn
vim /etc/netns/protonvpn-ch/resolv.conf
nameserver 127.0.0.1
vim /etc/netns/vm-down/resolv.conf
nameserver 127.0.0.1
vim /etc/netns/vm-down/resolv.conf.vpn
nameserver 10.33.0.5
vim /etc/netns/protonvpn-ch/iptables/rules.v4
# Generated by xtables-save v1.8.2 on Tue Oct 20 19:35:40 2020
*filter
:INPUT ACCEPT [0:0]
:FORWARD ACCEPT [0:0]
:OUTPUT ACCEPT [0:0]
COMMIT
# Completed on Tue Oct 20 19:35:40 2020
# Generated by xtables-save v1.8.2 on Tue Oct 20 19:35:40 2020
*nat
:PREROUTING ACCEPT [0:0]
:INPUT ACCEPT [0:0]
:POSTROUTING ACCEPT [0:0]
:OUTPUT ACCEPT [0:0]
-A POSTROUTING -o tun0 -j MASQUERADE
COMMIT
# Completed on Tue Oct 20 19:35:40 2020
touch /etc/netns/protonvpn-ch/iptables/rules.v6
touch /etc/netns/vm-down/iptables/rules.v4
touch /etc/netns/vm-down/iptables/rules.v6
vim /etc/netns/protonvpn-ch/network/netns-scripts/protonvpn-ch
#!/bin/sh

set -e;
set -x;

TASK="$1";
NS="$2";

case "$TASK" in
        up-outer)
                ifup pvpn-ch
                ;;
        down-outer)
                ;;
        up-inner)
                echo "DUMMY"
                iptables-restore < /etc/netns/protonvpn-ch/iptables/rules.v4
                ip6tables-restore < /etc/netns/protonvpn-ch/iptables/rules.v6
                ;;
esac
chmod +x /etc/netns/protonvpn-ch/network/netns-scripts/protonvpn-ch

vim /etc/network/netns-ctl.conf
netns main
 pid 1
 auto link main-protonvpn-ch
 auto link main-vm-down
 end

netns protonvpn-ch
 pid foreign
 auto link main-protonvpn-ch
 auto link protonvpn-ch-vm-down
 end

netns vm-down
 pid foreign
 auto link main-vm-down
 auto link protonvpn-ch-vm-down
 end

link main-protonvpn-ch
 iface main in protonvpn-ch
 iface pvpn-ch in main
 end

link protonvpn-ch-vm-down
 iface vm-down in protonvpn-ch
 iface pvpn-ch in vm-down
 end

link main-vm-down
 iface main in vm-down
 iface vm-down in main
TODO: Maybe have netns-ctl balk if there are auto links but no link tags?
vim /etc/systemd/system/netns\@.service
[Unit]
Description=Network Namespace %i
Wants=network-pre.target
Before=network-pre.target

[Service]
Type=oneshot
RemainAfterExit=yes
ExecStart=bash -c 'mkdir -p /run/netns &&  touch /run/netns/"%i" && mount --bind /proc/self/ns/net /run/netns/"%i"'
ExecStop=/usr/bin/ip netns delete "%i"
KillMode=none

[Install]
WantedBy=multi-user.target
vim /etc/systemd/system/netns-ctl\@.service
[Unit]
Description=Network Namespace - CTL %i
Wants=network-pre.target
Before=network-pre.target
After=netns@%i.service
BindsTo=netns@%i.service

[Service]
Type=oneshot
RemainAfterExit=yes
ExecStart=/usr/local/sbin/netns-ctl netnsup %i
ExecStop=/usr/local/sbin/netns-ctl netnsdown %i
KillMode=none

[Install]
WantedBy=multi-user.target
mkdir -p /etc/systemd/system/netns@{protonvpn-ch,vm-down}.service.d/
$ vim /etc/systemd/system/netns@protonvpn-ch.service.d/override.conf
[Service]
PrivateNetwork=yes
[Unit]
After=netns@protonvpn-ch.service
BindsTo=netns@protonvpn-ch.service

$ vim /etc/systemd/system/netns@vm-down.service.d/override.conf
[Service]
PrivateNetwork=yes

[Unit]
After=netns@protonvpn-ch.service
mkdir /etc/systemd/system/openvpn@protonvpn-ch.service.d/
$ vim /etc/systemd/system/openvpn@protonvpn-ch.service.d/override.conf
[Unit]
BindsTo = netns@protonvpn-ch.service
JoinsNamespaceOf = netns@protonvpn-ch.service
After = netns@protonvpn-ch.service

[Service]
PrivateNetwork = true
BindPaths=/etc/netns/protonvpn-ch/resolv.conf:/etc/resolv.conf
BindPaths=/etc/netns/protonvpn-ch/resolv.conf.vpn:/etc/resolv.conf.vpn
mkdir /etc/openvpn/protonvpn/
touch /etc/openvpn/protonvpn/login.conf
chmod 600 /etc/openvpn/protonvpn/login.conf
vim /etc/openvpn/protonvpn/login.conf
username
password
mkdir /etc/openvpn/protonvpn/ch/
vim /etc/openvpn/protonvpn/ch/ch.ovpn (modified ProtonVPN CH Config)
#
# The MIT License (MIT)
#
# Permission is hereby granted, free of charge, to any person obtaining a copy
# of this software and associated documentation files (the "Software"), to deal
# in the Software without restriction, including without limitation the rights
# to use, copy, modify, merge, publish, distribute, sublicense, and/or sell
# copies of the Software, and to permit persons to whom the Software is
# furnished to do so, subject to the following conditions:
#
# The above copyright notice and this permission notice shall be included in all
# copies or substantial portions of the Software.
#
# THE SOFTWARE IS PROVIDED "AS IS", WITHOUT WARRANTY OF ANY KIND, EXPRESS OR
# IMPLIED, INCLUDING BUT NOT LIMITED TO THE WARRANTIES OF MERCHANTABILITY,
# FITNESS FOR A PARTICULAR PURPOSE AND NONINFRINGEMENT. IN NO EVENT SHALL THE
# AUTHORS OR COPYRIGHT HOLDERS BE LIABLE FOR ANY CLAIM, DAMAGES OR OTHER
# LIABILITY, WHETHER IN AN ACTION OF CONTRACT, TORT OR # OTHERWISE, ARISING
# FROM, OUT OF OR IN CONNECTION WITH THE SOFTWARE OR THE USE OR OTHER DEALINGS
# IN THE SOFTWARE.
# ==============================================================================

client
dev tun
proto udp

remote ch.protonvpn.com 80
remote ch.protonvpn.com 443
remote ch.protonvpn.com 4569
remote ch.protonvpn.com 1194
remote ch.protonvpn.com 5060

remote-random
resolv-retry infinite
nobind
cipher AES-256-CBC
auth SHA512
comp-lzo no
verb 3

tun-mtu 1500
tun-mtu-extra 32
mssfix 1450
persist-key
persist-tun

reneg-sec 0

remote-cert-tls server
auth-user-pass
pull
fast-io


<ca>
...
</ca>

key-direction 1
<tls-auth>
...
</tls-auth>

cd /etc/openvpn/protonvpn/
pull-filter ignore redirect-gateway
redirect-gateway local
auth-user-pass login.conf
script-security 2
up ch-test
down ch-test
ifconfig-noexec
route-noexec
route-up ch-test

keepalive 10 120
status /etc/openvpn/protonvpn/ch/openvpn-status.log
#route-down ch-test
#
#
auth-retry nointeract
vim /etc/openvpn/protonvpn/ch/ch-test
#!/bin/bash
#
# Parses DHCP options from openvpn to update resolv.conf
# To use set as 'up' and 'down' script in your openvpn *.conf:
# up /etc/openvpn/update-resolv-conf
# down /etc/openvpn/update-resolv-conf
#
# Used snippets of resolvconf script by Thomas Hood and Chris Hanson.
# Licensed under the GNU GPL.  See /usr/share/common-licenses/GPL.
#
# Example envs set from openvpn:
#
#     foreign_option_1='dhcp-option DNS 193.43.27.132'
#     foreign_option_2='dhcp-option DNS 193.43.27.133'
#     foreign_option_3='dhcp-option DOMAIN be.bnc.ch'
#

set -ex

[ "$script_type" ] || exit 0
[ "$dev" ] || exit 0

split_into_parts()
{
        part1="$1"
        part2="$2"
        part3="$3"
}

ROUTING_TABLE=666

echo "MODE START: $script_type"

case "$script_type" in
  up)
        NMSRVRS=""
        SRCHS=""
        foreign_options=$(printf '%s\n' ${!foreign_option_*} | sort -t _ -k 3 -g)
        for optionvarname in ${foreign_options} ; do
                option="${!optionvarname}"
                echo "$option"
                split_into_parts $option
                if [ "$part1" = "dhcp-option" ] ; then
                        if [ "$part2" = "DNS" ] ; then
                                NMSRVRS="${NMSRVRS:+$NMSRVRS }$part3"
                        elif [ "$part2" = "DOMAIN" ] ; then
                                SRCHS="${SRCHS:+$SRCHS }$part3"
                        fi
                fi
        done
        R=""
        [ "$SRCHS" ] && R="search $SRCHS
"
        for NS in $NMSRVRS ; do
                R="${R}nameserver $NS
"
        done
        echo -n "$R" > /etc/resolv.conf.vpn # ip netns exec `ip netns identify` tee /etc/resolv.conf
        cat /etc/resolv.conf.vpn

        #ip link set  dev "$dev"  up  netns "vm-down"  mtu "$tun_mtu" 2>&1 | logger
        #ip netns exec "vm-down" date 2>&1 | logger

        ip link set dev "$dev" up mtu "$tun_mtu"

        # set device address
        netmask4="${ifconfig_netmask:-30}"
        netbits6="${ifconfig_ipv6_netbits:-112}"

        if [ -n "$ifconfig_local" ]; then
            if [ -n "$ifconfig_remote" ]; then
                   /sbin/ip -4 addr add \
                       local "$ifconfig_local" \
                       peer "$ifconfig_remote/$netmask4" \
                       ${ifconfig_broadcast:+broadcast "$ifconfig_broadcast"} \
                       dev "$dev"
            else
                   /sbin/ip -4 addr add \
                       local "$ifconfig_local/$netmask4" \
                       ${ifconfig_broadcast:+broadcast "$ifconfig_broadcast"} \
                       dev "$dev"
            fi
            #ip -4 route
            #ip -4 route | grep "src $ifconfig_local" || true
            #ip -4 route | grep "src $ifconfig_local" | xargs -iIII -n 1 echo ip -4 route add III table $ROUTING_TABLE
            #ip -4 route | grep "src $ifconfig_local" | xargs -iIII -n 1 ip -4 route add III table $ROUTING_TABLE
            #10.0.1.4/30 dev vm-down proto kernel scope link src 10.0.1.6
        fi
        if [ -n "$IPV6" -a -n "$ifconfig_ipv6_local" ]; then
            if [ -n "$ifconfig_ipv6_remote" ]; then
                   /sbin/ip -6 addr add \
                      local "$ifconfig_ipv6_local" \
                      peer "$ifconfig_ipv6_remote/$netbits6" \
                      dev "$dev"
            else
                   /sbin/ip -6 addr add \
                      local "$ifconfig_ipv6_local/$netbits6" \
                      dev "$dev"
            fi
        fi

        ;;
  route-up)
        i=1

        while
            eval net=\"\$route_network_$i\"
            eval mask=\"\$route_netmask_$i\"
            eval gw=\"\$route_gateway_$i\"
            eval mtr=\"\$route_metric_$i\"
            [ -n "$net" ]
        do
            /sbin/ip -4 route add  "$net/$mask"  via "$gw"  ${mtr:+metric "$mtr"} table $ROUTING_TABLE
            i=$(( i + 1 ))
        done
        if [ -n "$route_vpn_gateway" ]; then
            /sbin/ip -4 route add  default  via "$route_vpn_gateway" table $ROUTING_TABLE
        fi

        if [ -n "$IPV6" ]; then
            i=1
            while
                # There doesn't seem to be $route_ipv6_metric_<n>
                # according to the manpage.
                eval net=\"\$route_ipv6_network_$i\"
                eval gw=\"\$route_ipv6_gateway_$i\"
                [ -n "$net" ]
            do
                /sbin/ip -6 route add  "$net"  via "$gw"  metric 100 table $ROUTING_TABLE
                i=$(( i + 1 ))
            done
            # There's no $route_vpn_gateway for IPv6. It's not
            # documented if OpenVPN includes default route in
            # $route_ipv6_*. Set default route to remote VPN
            # endpoint address if there is one. Use higher metric
            # than $route_ipv6_* routes to give preference to a
            # possible default route in them.
            if [ -n "$ifconfig_ipv6_remote" ]; then
                /sbin/ip -6 route add  default \
                    via "$ifconfig_ipv6_remote"  metric 200 table $ROUTING_TABLE
            fi
        fi

        ip rule add iif vm-down lookup $ROUTING_TABLE
        ;;
  down)
        ip rule del iif vm-down lookup $ROUTING_TABLE
        echo > /etc/resolv.conf.vpn
        ;;
esac

echo "MODE END: $script_type"
chmod +x /etc/openvpn/protonvpn/ch-test
ln -s /etc/openvpn/protonvpn/ch/ch.ovpn /etc/openvpn/protonvpn-ch.conf
vim /etc/systemd/system/openvpn\@protonvpn-ch.service.d/override.conf
[Unit]
BindsTo = netns@protonvpn-ch.service
JoinsNamespaceOf = netns@protonvpn-ch.service
After = netns-ctl@protonvpn-ch.service

[Service]
PrivateNetwork = true
BindPaths=/etc/netns/protonvpn-ch/resolv.conf:/etc/resolv.conf
BindPaths=/etc/netns/protonvpn-ch/resolv.conf.vpn:/etc/resolv.conf.vpn
TODO: Upstream "foreign" mode for netns-ctl
systemctl enable --now netns@main netns-ctl@main
systemctl enable --now netns@protonvpn-ch netns-ctl@protonvpn-ch
systemctl enable --now netns@vm-down netns-ctl@vm-down
vim /etc/systemd/system/dnsmasq-netns\@.service
[Unit]
Description=dnsmasq - A lightweight DHCP and caching DNS server
Requires=network.target
Wants=netns-ctl@%i.service
After=network.target netns-ctl@%i.service
BindsTo = netns-ctl@%i.service
JoinsNamespaceOf = netns@%i.service

[Service]
Type=forking
PIDFile=/run/dnsmasq/dnsmasq-netns-%i.pid

# Test the config file and refuse starting if it is not valid.
ExecStartPre=/usr/sbin/dnsmasq --conf-dir /etc/dnsmasq/netns/%i/,*.conf --resolv=/etc/netns/%i/resolv.conf.vpn --test

# We run dnsmasq via the /etc/init.d/dnsmasq script which acts as a
# wrapper picking up extra configuration files and then execs dnsmasq
# itself, when called with the "systemd-exec" function.
ExecStart=/usr/sbin/dnsmasq --conf-dir /etc/dnsmasq/netns/%i/,*.conf --resolv=/etc/netns/%i/resolv.conf.vpn -x /run/dnsmasq/dnsmasq-netns-%i.pid

# The systemd-*-resolvconf functions configure (and deconfigure)
# resolvconf to work with the dnsmasq DNS server. They're called like
# this to get correct error handling (ie don't start-resolvconf if the
# dnsmasq daemon fails to start.
#ExecStartPost=/etc/init.d/dnsmasq systemd-start-resolvconf
#ExecStop=/etc/init.d/dnsmasq systemd-stop-resolvconf


ExecReload=/bin/kill -HUP $MAINPID

PrivateNetwork = true
BindPaths=/etc/netns/%i/resolv.conf:/etc/resolv.conf
BindPaths=/etc/netns/%i/resolv.conf.vpn:/etc/resolv.conf.vpn

[Install]
WantedBy=multi-user.target
mkdir /etc/dnsmasq/netns/{protonvpn-ch,vm-down}
vim /etc/dnsmasq/netns/protonvpn-ch/dnsmasq.conf
interface=main
interface=vm-down
interface=lo
no-dhcp-interface=main
no-dhcp-interface=tun0
no-dhcp-interface=lo
no-hosts
vim /etc/dnsmasq/netns/vm-down/dnsmasq.conf
interface=eth1-down
interface=lo
no-dhcp-interface=pvpn-ch
no-hosts
vim /etc/hosts
#PVPN-CH START
127.0.0.1 ch.protonvpn.com ch-12.protonvpn.com
127.0.0.1 ch.protonvpn.com node-ch-03.protonvpn.net
127.0.0.1 ch.protonvpn.com node-ch-02.protonvpn.net
#PVPN-CH STOP

$ vim /root/newpvpnch.sh
#!/bin/bash

SERVERS="`curl https://account.protonvpn.com/api/vpn/logicals | jq -r '[.LogicalServers[] | select( .ExitCountry == "CH" and .Tier >= 2 and .Load < 40 and .Features == 4 and .Status == 1) | { "entryIP": .Servers[0].EntryIP, "exitIP": .Servers[0].ExitIP,  "score": .Score, "load": .Load, obj: ., "domain": .Servers[0].Domain }] | sort_by(.score)[:3] | .[] | "\(.entryIP) ch.protonvpn.com \(.domain)"' | sort -R ` "
echo -e "$SERVERS"
perl -e '$/=undef; my $string = <STDIN>; $string =~ s/#PVPN-CH START.+#PVPN-CH STOP/#PVPN-CH START\n'"$SERVERS"'\n#PVPN-CH STOP/igs; print $string;' < /etc/hosts > /etc/hosts.tmp
cat /etc/hosts.tmp
cp /etc/hosts{,.bak}
mv /etc/hosts.tmp /etc/hosts

systemctl restart openvpn@protonvpn-ch
journalctl --follow -u openvpn@protonvpn-ch

$ chmod +x /root/newpvpnch.sh
systemctl enable --now dnsmasq-netns@vm-down.service
systemctl enable --now dnsmasq-netns@protonvpn-ch.service
TODO: persist firewall masquerade for outgoing traffic for the vpn connection
bash
iptables -t nat -I POSTROUTING -s 10.33.0.2 -o br0 -j MASQUERADE
TODO: create firewall rules on all NS to limit traffic between main and protonvpn-ch/vm-down
/root/new/pvpnch.sh
Wait until VPN is connected(if it does not connect, debug) and then this should work:
bash
ip netns exec vm-down ping google.de
ip netns exec vm-down curl ipinfo.io
Install packages:
$ apt install sane scanbd netpbm ghostscript poppler-utils imagemagick unpaper util-linux tesseract-ocr parallel units bc tesseract-ocr-deu ocrmypdf libtiff-tools
Add to the end of /etc/scanbd/fujitsu.conf:
ix1400
usb 0x04c5 0x1630
In /etc/scanbd/dll.conf comment out everything except "fujitsu".conf
:0,%s/^/#/
:0,%s/^#fujitsu/fujitsu/
Raspberry PI throws kernel OOPS around otherwhise due to scanbd trying to access devices the PI does not have(i assume a parrallel port or something).
Create "/etc/udev/rules.d/99-futjitsu.rules" with:
Fujitsu ix1400
ATTRS{idVendor}=="04c5", ATTRS{idProduct}=="1630", ENV{libsane_matched}="yes"
$ udevadm control --reload-rules $ udevadm trigger
< Reconnect Device by closing/reopening the lid>
$ systemctl stop scanbd.service
Verify that you see the device via: $ sudo -u saned bash -c "SANE_CONFIG_DIR=/etc/scanbd/ scanimage -L" device `fujitsu:ScanSnap iX1400:890' is a FUJITSU ScanSnap iX1400 scanner
If this does not work check udev rules.
In /etc/scanbd/scanbd.conf: Change group to saned Comment out everything except fujitsu.conf at the end.
$ systemctl start scanbd.service
In /etc/sane.d/dll.conf comment out everything except "net" :0,%s/^/#/ :0,%s/^#net/net/
Do the same for everything under /etc/sane.d/dll.d/
In "/etc/sane.d/net.conf" uncomment connection_timeout = 60 and add localhost to the end.
In /etc/inetd.conf comment out: sane-port stream tcp nowait saned /usr/sbin/scanbm scanbm
Restart inetd.service: $ systemctl restart inetd.service
Restart and check scanbm.socket systemctl start scanbm.socket systemctl status scanbm.socket
When scanbd gets a event it will free the usb device, this allows scanbm to provide the scanner to local/remote sane clients without having to stop scanbd. After the action script finished, watch by scanbd is resumed again. Yes its this insane. No not libinsane.
$ mkdir /var/lib/saned $ chown saned: /var/lib/saned $ sudo -u saned bash
ssh-keygen
< defaults are ok>
copy pub key to server
Create /etc/scanbd/scripts/test.script:
!/bin/bash
set -xe
trap 'catch $? $LINENO' EXIT
catch() { if [ "$1" != "0" ]; then echo "error $1 occured on $2" >> $LOG_FILE echo "error $1 occured on $2" | mosquitto_pub -t $MQTT_TOPIC -l fi }
MQTT_TOPIC=sj/rpi-sj/scan LOG_FILE=/tmp/scanbd.log ACTION=$SCANBD_ACTION UPLOAD_HOST=rpi-scan@XX UPLOAD_PATH=/scans
now=date +"%Y-%m-%d-%H%M%S"
filename=scan-$now.pdf
filepath=/tmp/scans/$filename
mkdir -p /tmp/scan
echo "-----" >> $LOG_FILE echo "ACTION: $ACTION" >> $LOG_FILE echo "SCANDIR: $filepath" >> $LOG_FILE echo "_____=" >> $LOG_FILE env >> $LOG_FILE echo "======" >> $LOG_FILE echo "......" >> $LOG_FILE if [ "$ACTION" == "scan" ]; then echo "running" | mosquitto_pub -t $MQTT_TOPIC -l
    echo "scanning" >> $LOG_FILE

    /opt/sane-scan-pdf-1.2/scan -d -r 300 -v -m Lineart --ocr --deskew --unpaper --skip-empty-pages -o $filepath >> $LOG_FILE 2>&1

    echo "uploading" >> $LOG_FILE

    echo "put $filepath $UPLOAD_PATH" | sftp -b - $UPLOAD_HOST >> $LOG_FILE 2>&1

    echo "setting permissions" >> $LOG_FILE

    echo "chmod 664 $UPLOAD_PATH/$filename" | sftp -b - $UPLOAD_HOST >> $LOG_FILE 2>&1

    echo "finished" | mosquitto_pub -t $LOG_FILE -l
fi
echo "-----" >> $LOG_FILE
git clone https://github.com/rocketraman/sane-scan-pdf or use releases from repo Place it into /opt.
This blog is powered by ikiwiki. Gitweb can be found under Gitweb.